Pygame DIY 3D Graphics - Part 2: Coding
- Dec 1, 2017
- 4 min read

Part 2 of the series will explain how to use the theory shown in Part 1 in python. Firstly, we will import some libraries and initiate pygame, as usual.
import pygame import time from math import radians, sin, cos, sqrt
pygame.init()
xSize, ySize = 1600, 800 screen = pygame.display.set_mode((xSize, ySize)) pygame.display.set_caption("3D Graphics")
The variable depth is the distance between the 'eye' and 'screen', discussed in Part 1. A smaller value increases the field of view. Then, ry and rx are the camera rotations. The camera starts by pointing 30 degrees downwards.
depth = 1000 #distance between thoertical screen and eye (changes fov)
Then, we create a class to store the camera coordinates.
class c: x, y, z = 50,80,-50 #camera coordinates
Now, we begin the function to produce 2D coordinates from 3D coordinates. We begin by moving all of the coordinates that we want to render by the camera coordinates, effectively meaning the camera remains still and the points translate instead.
def get_2d(x, y, z): #Algorithm to convert 3D coordinates into 2D screen coordinates x -= c.x y -= c.y z -= c.z
Next, we rotate the points around the camera (instead of the camera rotating). We do this by applying the rotation matrix with both rx and ry, being careful to use the original versions of x and y in our calculation (hence oldx and oldy). Without the line z -= depth, the camera will be too far behind and thus everything will appear to rotate about a point in the distance.
oldx = x oldy = y #turning camera x = x*cos(radians(rx)) - z*sin(radians(rx)) z = z*cos(radians(rx)) + oldx*sin(radians(rx))
y = y*cos(radians(ry)) - z*sin(radians(ry)) z = z*cos(radians(ry)) + oldy*sin(radians(ry))
z -= depth
Now, we define the coordinates of the eye and apply the formula derived from the maths described in Part 1. Then we change the 2D coordinates generated by half the screen size to account for the fact that the origin in Pygame is at the top left of the screen with y increasing downwards.
class e: x, y, z = 0,0,-depth #eye coordinates try: x = x + (0 - z)*(x - e.x)/(z - e.z) except: x = c.x try: y = y + (0 - z)*(y - e.y)/(z - e.z) except: y = c.y
x += xSize/2 y = ySize/2 - y
One problem with the algorithm is that any point behind the eye can still form a straight line intersecting the screen even though we don't want to render it. Therefore, we return an error in case that happens. Else, the 2D coordinates are returned, concluding the function.
if z <= e.z: return "error" return int(x), int(y)
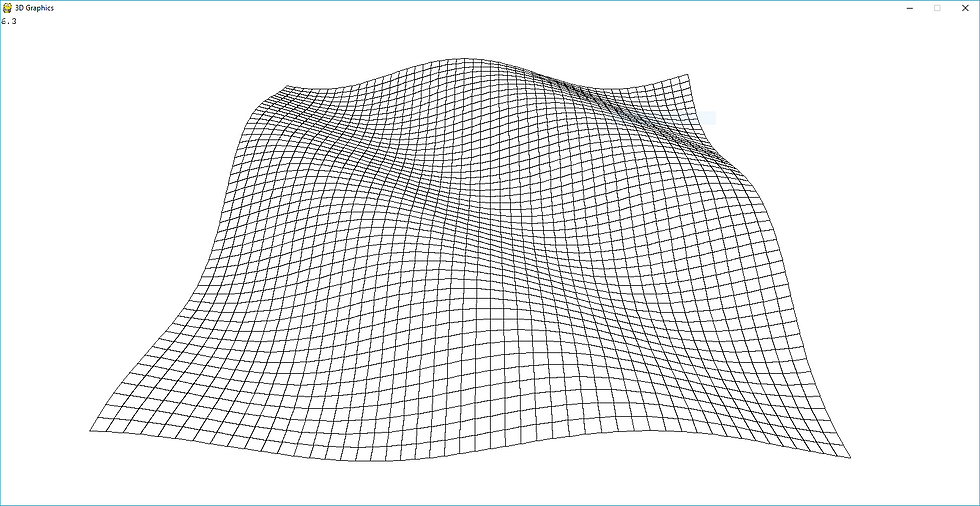
For demonstration, we will be rendering a grid which moves in a sine wave. We will store the 3D coordinates of each grid point in the array landscape. The y values will be manipulated in the main loop.
landscape = [] #generating flat landscape for x in range(0,100,2): for z in range(0,100,2): landscape.append((x,30,z))
We begin our main loop, with fc being the frame count, or number of frames that have passed since the beginning.
#----------------------Main Loop----------------------#
clock = pygame.time.Clock() fc = 0 done = False while not done: fc += 1
Next, we define the function of certain keys. Holding the escape button will let us use the mouse freely, as usual, allowing us the click the X, terminating the program. Else, the program will grab and hide the mouse and manipulate the rotation values rx and ry based on the movement of the mouse. Then, WASD moves the camera in the x-z plane and space and ctrl change the y value. We use trigonometry to move the camera coordinates so that we always move relative to the direction we are looking.
keys = pygame.key.get_pressed() for event in pygame.event.get(): if event.type == pygame.QUIT: done = True
if keys[pygame.K_ESCAPE]: pygame.mouse.set_visible(True) pygame.event.set_grab(False) else: delta_x, delta_y = pygame.mouse.get_rel() pygame.mouse.set_visible(False) pygame.event.set_grab(True) rx += delta_x/30 ry -= delta_y/30 if ry > 90: ry = 90 if ry < -90: ry = -90 if keys[pygame.K_w]: c.x += sin(radians(rx)) c.z += cos(radians(rx)) if keys[pygame.K_a]: c.x += sin(radians(270 - rx)) c.z += -cos(radians(270 - rx)) if keys[pygame.K_s]: c.x += -sin(radians(180 - rx)) c.z += cos(radians(180 - rx)) if keys[pygame.K_d]: c.x += sin(radians(90 - rx)) c.z += -cos(radians(90 - rx)) if keys[pygame.K_SPACE]: c.y += 1 if keys[pygame.K_LCTRL]: c.y -= 1
Now we fill the screen blank, removing all colours from the previous frame.
screen.fill([255,255,255])
Then, we change the y value of every coordinate in our landscape, so that they follow a sine wave based on time and distance from the bottom corner (parallel to the diagonal).
for i in range(len(landscape)): #creating landscape landscape[i] = (landscape[i][0], 30 + 4*sin(5*radians(landscape[i][2] + landscape[i][0] + fc)), landscape[i][2])
The list render will store all of the 2D coordinates of our landscape.
render = []
for i in range(len(landscape)): #rendering landscape
render.append(get_2d(landscape[i][0],landscape[i][1],landscape[i][2]))
We will draw the grid by making individual squares between four adjacent points. To form the grid, we therefore only have to draw every other grid, else every line will be drawn twice. Hence our for loop goes up in 2s. The if statement makes sure each square we choose to render is not in the same column as the square below it.
for i in range(0,len(landscape),2): if int(i/50)%2 != 0: i += 1
Then we draw the squares. If an error is returned, the error is ignored. The purpose of the if statement is so that squares who's points are on the opposite edges of the whole landscape are skipped.
#drawing landscape polygons if (i+1) % 50 != 0 and i < len(landscape) - 50: try: outline = pygame.draw.polygon(screen, [0,0,0],(render[i],render[i+1],render[i+51],render[i+50]),1)
except: pass
Now we display the framerate, though this is optional (and slightly reduces the framerate!). This program requires a fare few calculations each frame. The framerate is lower than you might expect because pygame only uses one core of the CPU, instead of the GPU or iterated graphics which should be used for a graphically demanding task like this.
fps = int(10*clock.get_fps())/10 fpsLabel = pygame.font.SysFont("monospace", 15).render(str(fps), 1, (0,0,0)) screen.blit(fpsLabel, (0,0)) #displays fps
We then display what we've draw and end the main loop.
pygame.display.flip() clock.tick(60)
pygame.quit()
This concludes the 3D graphics script. Here's the whole code:


Comments