Toggling LED's using just your voice
- Feb 1, 2017
- 3 min read

Now that we have the basic coding knowledge from our previous blog on how to use Google's basic speech API, we can now do something cool with it: which is toggling a basic LED with your voice! If you haven't checked out the previous blog, be sure you do in order to know about what's going on. You can check it out by clicking here.
We are going to connect the LED (with a resistor) onto an Arduino board (any) and connect it via microUSB to our PC. That is all the hardware done, since the rest is all software.
We are going to use Python to write a simple code which will communicate to the serial port of our PC that we are using with voice input, which then executes another piece of code written in Arduino IDE in order to either turn an LED on or off via the board. This might sound complicated but the two codes are quite easy to implement and understand. There is no complicated coding structure or libraries involved and can be done using basic 'if' structures.
Here is a picture of the hardware wiring:

Here you can see just a basic LED setup with a resistor connected to an Arduino Mega 2560 board.
Let's get on to the first piece of code which is the Python Speech Recognition one:
Python Code
Our Python code is very similar to the basic example, except now we have an additional 'if' structure in order to know what the command 'lights on' or 'lights off' means to the computer. We assign a variable, H and L in order to denote whether we want the LED to turn on or off. Please keep in mind that, the shorter the variable is (one letter or number), the quicker the whole process will respond. I have tried this with longer strings and it didn't work as well as this.
Furthermore, there is a serial function where we call our serial port before writing to it the command serial.write()
If you don't know how to get your serial port name, you can find it out by using the Tools tab in Arduino IDE.
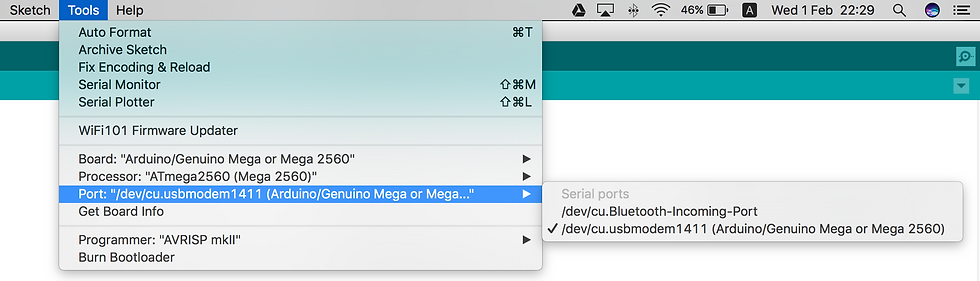
We can see from here that my serial port string is /dev/cu.usbmodem1411. However, yours might be a different from mine, so keep a watch for that. We write a serial call function in Python to communicate to this specific port with a 9600 baud rate in order to send H or L to the Arduino code.
import speech_recognition as rc import serial import time rec = rc.Recognizer() with rc.Microphone() as source: print("Say something!") audio = rec.listen(source)
try: print(rec.recognize_google(audio)) except rc.UnknownValueError: print("I cannot understand what you said") except rc.RequestError as e: print("Could not request results from server; {0}".format(e))
word = rec.recognize_google(audio) if word == ('lights on'): a = 'H' elif word == ('lights off'): a = 'L' ser = serial.Serial("Insert your serial port string here", 9600) time.sleep(1) ser.write(a)
Note from this that I have included a time.sleep delay for 2 seconds. This is absolutely crucial since if we didn't have that, we would be communicating to the port so fast, that the execution code can't keep up. Now that we have the speech recognition code done, we can now move onto the Arduino code that we will be uploading onto the board. There is nothing complicated here so everything is quite self-explanatory:
Arduino Code
char val; int led1 = 26;
void setup() {
pinMode(led1, OUTPUT); Serial.begin(9600); }
void loop(){
if( Serial.available() ) { val = Serial.read(); } if( val == 'H' ) { digitalWrite(led1, HIGH); } else { digitalWrite(led1, LOW); } delay(100); }
We can see from here that we have used Serial.read in order to read whether the Python program has sent an 'H' or anything else and this means whether we toggle the LED on or off. We can now upload this onto the board but we still need the board to be connected to the PC.
Once we have this completed, just run the Python code and see the whole thing unfold.

Here is a video of the whole process!


Comments